Thursday, July 30, 2015

A picnic at Lazarus Island

My first visit to the southern islands was several years ago and I had been yearning to to visit the southern islands of Singapore since then. The 3 most accessible islands are St. John's, Lazarus and Kusu island.

The special thing about these islands is that they are beautifully quiet and scenic without massive weekend crowds at most beaches in mainland Singapore.

Not many people go there because it is that it is not particularly convenient to get there. It is now a lot more convenient with the new Marina South Pier MRT station that leads right to the pier, but some planning is required as the ferries leave every 2 hourly takes some time to loop from mainland to St. John's, to Kusu and then back to mainland. A return trip ticket is slightly at the expensive side of $18.

In addition, there are no touristy shops or eateries at those islands as you although we did see a sign pointing to a cafeteria at St.John's island. After all, it is home to the Tropical Marine Science Institute and Agri-Food & Veterinary Authority of Singapore's Marine Aquaculture Centre. In essence, you have to take along with you everything that you will need on your trip there.

Here's what I brought for my trip:

1) A picnic mat
2) A cooler box
3) Lunch - a packet of Swiss Deli Rosti, Norwegian smoked salmon, sour cream and some pepper
4) Tea - a mixture of lavender and chrysanthemum flowers
5) Some nice cold yoghurt
6) Pre-washed salad mix
7) Trangia 25-4 Alcohol stove kit
8) 500ml of Methanol fuel

There are several beaches to choose from. You can choose one that overlooks the city skyline or one that faces the vast ocean. It is amazing to see yachts coming close to the shoreline and partying. Talk about exclusivity man.

We chose to sit at one that overlooked the vast openness and started boiling ourselves some tea using the Trangia. It was windy and the fuel usage was a lot more than what I am used to when playing with the stove at home. Thankfully, I brought more than enough fuel and the integrated windshield worked well in giving me usable heat for boiling the water. Honestly, while tea was good, I couldn't help feel that an ice cold beer would satisfy me so much more in such intense heat.

Unfortunately, we did not take too many pictures while we were there. Here is a nice aerial video that someone has uploaded to youtube. It really is a beautiful place.


Wednesday, July 08, 2015

Cooking rice with the Trangia 25-4 using solid fuel (hexi / esbit tablets)

Ok, this blog post is sort of a two in one post where I will talk about cooking rice using the Trangia 25-4 as well as the use of solid fuel instead of the regular alcohol burner.

Most outdoor people use their camping stove to cook food that is easy to prepare and fast. They do so for good reasons such as to beat an intense hunger from a long day's hike and daylight is diminishing fast. In Singapore, there is hardly any need to do so because scenic outdoor spots are a stone's throw away from delicious eateries, with the exception of places like Pulau Ubin and the southern islands.

The impetus of this write up is due the fact that my girlfriend dislikes eating canned food, but I like the idea of having a meal while watching a beautiful sunset surrounded by nature. To harmonize these two conditions, I have been trying out cooking proper food using my outdoor equipment while still in the comforts of my own home.

I read much about the cooking ability of the Trangia and wanted to try out cooking something proper. Being Chinese, rice is a staple food for us and it provides a good amount of carbohydrate. However, cooking rice properly without turning it into mush or burning it can be quite an art that not all dedicated rice cookers can attain.

The Trangia, with its ability to simmer to a near boil, comes in very helpful in helping the rice cook and absorb water without burning it. The simmer ring and its functions had been tried and tested many times by the good people of the interwebs. So, I wanted to give myself a little more of challenge and tried out using an alternative fuel.

I brought out the ubiquitous solid fuel (otherwise known as "esbit" or "hexi" tablets in the western world) that we use in the army. Unlike methanol, it is easy to obtain solid fuel at most army surplus or camping shops. The standard 8-tablet box that the Singapore Army uses and it is cheap to buy at about $1.40 per box.

Being solid, the fuel is easy to store and carry around. In addition, it is easy to distinguish between fuel and food. Methanol, or denatured alcohols are toxic but not unpleasant enough to warn people of it by itself. Moreover, it is not easy to obtain cheap denatured alcohols in Singapore anyway.

Ok, enough introduction. Let's get down to using solid fuel on a Trangia to cook plain rice!


A standard sized jelly mound for holding solid fuel

Firstly, Trangia sells an attachment for gel and solid fuel. I thought it would be strange to insist on buying an original cup just so it fits in the holder. So instead, I bought a cheap aluminum jelly mound from NTUC Fairprice to hold the solid fuel.


There is no special instruction to cooking rice. This would be the amount of water I mix with my rice if it was to be cooked in a rice cooker.

 
The Trangia cooking rice in complete silence. Note that the bowl was left open only for picture taking. I covered the bowl with the included frying pan soon after taking the picture.

Once the water starts boiling, I lowered the heat output by restricting air flow to the solid fuel. For simplicity, I used a piece of aluminum foil and it worked perfectly. It was able to slow down the burn of the solid fuel, keep the rice at near boiling point.

After about 30mins, the rice was cooked. One of my testers commented that it tasted normal. This was high praise for the Trangia.

 
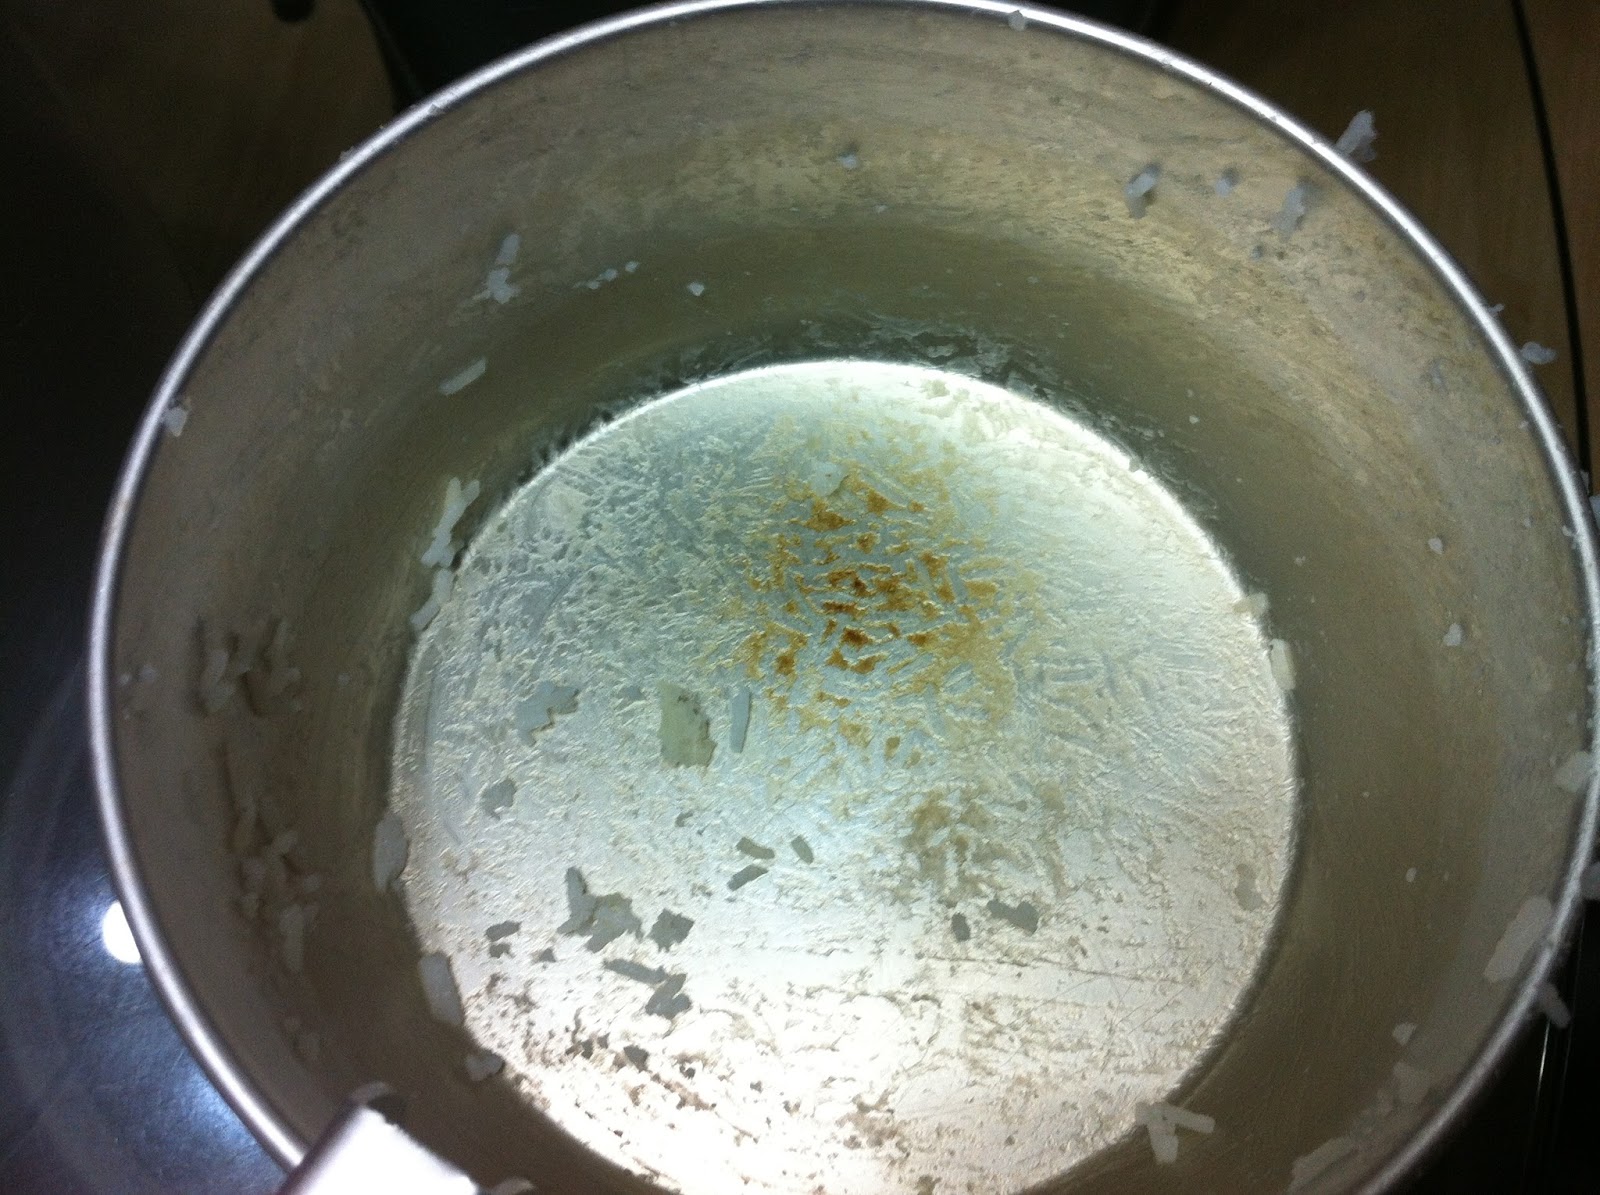
The rice was slightly burnt at the spot where the flame is present. Thinking back, I should have taken the bowl off the flame once the rice had fluffed up but still slightly wet.

In simmer mode, the burn of the solid fuel was slow and efficient. I used less than 1 piece of solid fuel, leaving about 1/4 to spare for my next use. I was extremely skeptical when someone claimed that it was possible for a solid fuel cube to burn 30-40mins as previous experience suggest that it lasts 15-20mins per cube but looks like it is possible.

 
As expected, solid fuel does burn dirtily. In simmer mode, the amount of soot is noticeably lesser than a tablet exposed fully to air.

So, yes it is possible to use solid fuel to a high degree of control just like alcohol in a Trangia. The fully integrated windscreen design also makes it very efficient. The cost of cooking rice for 3 persons works out to be about 20cents (I bought a packet of 8 cubes for $1.40).

This will be a great addition to my picnic outings.

Have fun!

Sunday, July 05, 2015

My Trangia 25-4 Camping Stove Kit


 The Trangia when fully deployed

I took a long time to consider buying this cooking stove set because, at $130, it is significantly more expensive than the other backpacking stoves I've got. My Campingaz Bluet was $25 and my solid fuel stove was a very affordable $2. To me, if an equipment is too expensive, I tend not to bring it out with me as I do not want to damage a beautifully designed and well made item.

The Trangia 25-4 is the bigger of the 3 sets and meant for cooking for 3-4 persons. The 27 series is for 1-2 persons while the Mini is adequate for 1.

Mmm... Cooking instant noodles is a breeze and you can fit the entire block of noodles inside without having to break it into smaller chunks. This packet of Korean Kimchi noodles is one of the bigger instant noodle packets and require longer time to cook to soften the noodles adequately.

The Trangia makes short work of this. I thought that it would turn this instant supper into a long wait but it was just as fast as my kitchen stove (any faster and its just wastefully boiling the soup away). Its easy to eat directly out of the pot, reducing the number of bowls to wash.

Well, unlike my other stoves, the Trangia 25-4 is a full self-contained set compete with a non-stick pan, bowls, kettle, windshield and alcohol stove. Being a set, it all nests together into the size of a bowl and fits well in a backpack. Being a non-pressurized alcohol stove, it is a little disadvantaged in terms of heating power compared to gas stoves and petroleum based (e.g. kerosene, white gas, petrol, etc.) liquid fuel stoves. Nevertheless, the designers have taken care of many aspects to overcomes its shortcomings and made it a particularly efficient and reliable stove.


The stove itself is a brass container to hold and burn the fuel. It burns methanol, ethanol (most recommended) and propanol (not recommended due to its sooty burn). Methanol and ethanol burns very cleanly and quietly. Its simple design means that there are very little that can go wrong with it when you are out in the wilderness. Despite its simplicity, it is still possible to control the flame up via a simmer ring which limits the rate of burn. Opening up the possibility of cooking more complex and delicious meals while you enjoy the sunset


For efficiency, the stove has little holes near its circumference. When the burner is hot enough, alcohol evaporates through those holes, forming a fire "bloom" similar to kitchen stoves, allowing of a better mixing of air and fuel for a leaner, more efficient burn. A blue flame is a hot flame. Yellow flame, not so good.

For reliability, the windshield is part of the whole stove set, greatly reducing loss of heat from the wind. In addition, it keeps the wind from blowing out the stove and forces hot air to travel up the sides of the pot before it escapes the stove. Another nice feature is that the stove itself is kept off the ground, minimizing heat loss and, lowers the chances of melting the snow beneath should it be used during winter time.

Just for fun, I used a tealight candle to heat up water, which explains the warm glow from the sides. It too was really slow, but I was surprised that it got hot enough for making coffee. Reaffirming the setup's high efficiency.

All these add up to form a very versatile, reliable and efficient stove for outdoor recreational use. For me, firing it up at a picnic would really open up a whole of food choices beyond prepacked sandwiches and pastries. The last time I went for a picnic, we had nice cakes, sandwiches and a thermos flask of mushroom soup. While it was nice, we couldn't help but envy the neighbouring picnickers who had a small disposable barbeque pit going on.

Unfortunately, like all things, it too has its weaknesses. First off, the stove is not particularly light and it can be an overkill for short hikes. Secondly, denatured alcohols or methanol is not easy to find in Singapore as people here have very little use for these. Pharmacies sell a small palm sized bottles for around $5 and some Home-Fix outlets sells a 500ml bottle for $3.50.

A small bottle of methanol that I bring along my stove. I have not tested how many meals I can get out of this.

About the fuel, methanol or denatured alcohol (methanol mixed with ethanol) is very unlike other obnoxious fuels such as kerosene or petrol. Alcohols typically smell pleasant and is said to taste sweet but it is just as poisonous as other fuels when consumed. Always use suitable containers and make sure that it is labelled clearly so that you and others do not mistake it as your booze stash. Consuming a small amount of methanol can cause blindness and subsequent death. If used correctly, its an extremely clean burning fuel that is easy to light up and dependable enough to work even in very low temperatures.

Saturday, June 06, 2015

Making Chrysanthemum tea

Chrysanthemum tea is probably one of the most common drink available at most Chinese restaurants. It is a light drink enjoyed over long hearty meals or simply over a conversation at tea time.

Preparation of Chrysanthemum tea requires about 45minutes of boiling dried Chrysanthemum flowers, sweetened to taste at the last phase of the boiling.


Also, its great fun to fire up the old school kerosene stove for this purpose. I rarely have any use for the kerosene stove due to the hassle of priming the generator tube, to vaporize kerosene fluid into gas as it leaves the nozzle, for an efficient, controllable burn. Otherwise, if its not hot enough, kerosene will shoot out as a liquid and create a fireball until the generator is finally up to temperature.


It turns out that I used 50ml of kerosene for this task and I find that it is easier to control the flame on this old school kerosene stove than a typical kitchen stove as the burner head is smaller. The flame will easily go off on a bigger kitchen stove if it is turned down too low.

It cost me 35 cents of fuel to make about 5 cups of home made Chrysanthemum tea. I did some math and found that using my home LPG gas will cost me 1/3 the price. Nevertheless, I like the fact that the kerosene stove can reasonably cook up something in the outdoors.


Friday, May 15, 2015

A Tommy Stove (a simple solid fuel stove)


  My $2.00 "Tommy" Stove and solid fuel


I've got this little lightweight fold-out stove from a neighborhood outdoor supplies shop at a very affordable price of $2.00.

Now, I've been fairly used to the fact that most quality camping equipment are on the expensive side due to the amount of thought put in to make it fit for the purpose of camping. On the other hand, cheaper products tend to disappoint me when its put to the test and would likely last a few uses before breaking. I once bought a brandless headlamp to use for a camping trip thinking that I should not be spending too much since I rarely camped. The cheap headlamp was dim to start out with and broke even before the trip itself, while my old Fenix L2D worked just fine.

The question is, will the inexpensive Tommy Stove actually be useful outdoors or is it just a novelty?

The stove can accommodate small mess mugs with this setting. Note that, at this angle, the metal tabs may bend under stress if the weight is too much to take.


The stove is a simple stamped metal that unfolds to form the supports for a pot stand and a place to put the solid fuel. By doing so, it gives a gap between the solid fuel and the stove such that it is near enough to absorb the heat produced while being far enough to let the fuel burn sufficiently before it hits and cool down at the pot surface, forming excessive amount of soot and residue. The elegance of this kind of outdoor stove and fuel is that it is so simple that there is hardly any way for it to malfunction, unlike other more sophisticated gas and pressurized liquid fuel stoves.

Use this setting for maximum support for bigger and heavier pots.

About the fuel itself, it is a white crumbly solid that comes in small cubes. In Singapore, it is prevalent and cheap as it is used by the local army. I first came across solid fuel during my national service days as part of our outfield ration package. A stove, however, was not provided.

The army style of using those solid fuel tablets is by digging a small hole in the ground, light up a piece of fuel and put our mess tin above the hole. Honestly, I had never once used solid fuel during my outfield days because the ration packs were good to eat cold and no one could be bothered with the extra step of cooking. After all, we were then in Basic Military Training and the most coveted luxury was sleep.

The size of the stove can keep a standard "BIC' type lighter and a maximum of 8 army-size solid fuel tablets. This is convenient to as this is all you need to start the stove up and it is one complete package and this will easily fit inside a army style mess tin set together with a packet of instant noodles. 

While a stove was not always necessary for solid fuel usage, it is a really convenient thing to have should you not want to dig holes and it keeps the fuel tablet from the ground that may be wet.


Oh yes, I've found this splendid online shop selling these at Army Market:
Tommy Cooker Stove @ $1.40
8x solid fuel tablets @ $1.40

Monday, April 20, 2015

Campingaz Bleuet 206 - My very first camping stove

A really simple French stove

I bought this canister stove a really long time ago. Probably more than 5 years ago when I first wanted add some fun into my late night gatherings. I thought it would be awesome to be able to make myself a piping hot cup of instant noodles while chatting with my friends at Yishun Dam.

My first encounter with such stoves was during my Outward Bound camp at Pulau Ubin during my JC days. It was one of the items that made the time past a little easier since I wasn't particularly comfortable being in the outdoors. It was dirty, uncomfortable and full of mosquitoes waiting to take a drink from my bloodstream. It was hard to appreciate that sort of nature.

Nevertheless, I was pretty happy to have a hot satisfying meal after a day full of activities. The gas canister stove was also very easy to use - plug the gas canister in, turn up the gas and light it. Nothing more difficult than the stove we have at home.

I bought the simple looking Campingaz Bleuet 206 at one of the stalls at Army Market (505 Beach Road) for $25, I think. The gas canister, containing 190g of gas, cost a reasonable $2 then. The Bleuet was probably the most simple portable gas stove easily accessible to us Singaporeans. The original version had been discontinued and the official webpage removed. Fortunately, google cache still has it in its database.


The typical army mess tin easily fits on the supports and the flame is captured directly underneath the tin, minimizing heat loss through the sides.

Piercing mechanism for gas canister
Unfortunately, there is a reason why the gas canisters so cheap. These canisters, unlike more sophisticated stoves that use a valve that allows you to detach for easier storage when on the go, they cannot be detached before they are fully used up - the c206 canisters do not have a valve and rely on the stove's piercing mechanism to release gas.

Cost effectiveness
The inability to remove the gas canister before it is empty does have its advantages when it comes to price. A 190g pierceable canister cost $3.70 while a similarly sized 230g valved canister costs $11. Both are available at Army Market.

The dimple in the middle is where the stove pierces into the canister

These days, with the proliferation of portable stoves used for steamboat, the cheapest gas canisters are those that feed these. If you are really looking to cook a lot outdoors, you will be better off getting a stove that uses these. The stove may be more expensive, but it makes sense in the long run.

Only this size fits this stove. It is a good size - small enough to pack while being big enough to last several days of cooking.

Ease of use
Being an upright stove, it is sometimes a challenge to find a ground flat enough for the set up to be stable. The base isn't very big and will require some attention.

The flame is produced by the stove is easy to control and very clean burning. It will not soot up the bottom of your mess tin, which is nice.

The heat produced is reasonable, but do watch out for winds as they rob the little burner's effectiveness rather easily.

Conclusion
This is quite a nice kit as a first stove and cost effective for students on a budget. The heat output is respectable despite its small size and it can even be used as a home backup stove should your family run out of gas and needed something to continue cooking with.


Friday, April 03, 2015

Portable Kerosene Stove for Picnic and Possibly camping

I have finally gotten the time to visit the shop to buy my Butterfly brand portable pressurized kerosene stove. It is a rather simple self-contained device that has its own pot stand, fuel tank and stove head in one robust solid construction.

Its golden brass fuel tank is exceptionally good looking as an ornamental display if you just want to keep a piece of history in your living room.

Fuel
As its name suggests, it is a kerosene fuel stove. The instruction manual suggests that you use top quality kerosene and strain the kerosene before pouring it into the fuel tank. This is important because the jet that shoots out the kerosene to the burner head is very fine. A clogged jet will affect the flame pattern and generally the amount of heat produced.

I bought my kerosene from Home-Fix and it cost $3.40 for 500ml. It is rather expensive considering that petrol costs $2 per litre. This means that kerosene is 3x as expensive as petrol. Kerosene stoves seems a little out of place in this region since there are petrol powered camping stoves and the petrol is easier to obtain than kerosene.

Pot size
The construction is so stable and versatile that it can take your average family sized pots without any problems. These stoves are said to be exported to countries such as Indonesia, possibly for everyday cooking.

How to use - priming and ignition
Before the stove can be used, there is a need to heat up the generator tube which vaporises the kerosene because it does not burn as a liquid and have to be in gaseous state in order to burn. It is a slightly tedious process here. To heat up the generator tube, a more flammable liquid, alcohol, is used for the initial burn. Alcohol fires up instantly and cleanly. For me, I broke up small pieces of solid fuel in place of alcohol because alcohol is very expensive - a 100g small bottle sold at a pharmacy costs
as much as $6. Because of this priming process, it is not cost effective to start up the stove unless you intend to cook continuously for some time.

Nearing the completion of the priming stage, the vent screw is shut and here comes some vigorous pumping to pressurize the fuel tank. As soon as enough pressure is generated, the jet pumps out gaseous kerosene that burns as an beautiful efficient blue flame at the burner head.

As with most other liquid fuel stoves, this one sounds like a mini jet engine. It is not exactly very loud, but it is way louder than the LPG household stoves that we are used to.

My thoughts
It is a beautiful little stove that belongs to a different time. We have come so far that the most advanced, convenient and powerful stoves is also the cheapest. A full LPG gas tank costs $30-40 and requires replacement about 4 months of daily cooking. Cooking via electricity is also very cheap and even be operated in a badly ventilated indoor environment as it does not produce any nasty gases and is completely silent.

Nevertheless, the old kerosene stove is portable. There are still instances where such a stove becomes useful such as picnics, car/motorcycle camping, fishing and possibly even for travelling. But an event such as this would be centred around the stove due to the inconvenient starting procedure rather than being part of the experience.


In south east Asia, you'll be hard pressed to find it useful when there are so many cheap eateries that very delicious food that is part of the experience itself.


Thursday, March 12, 2015

Pressurized kerosene lanterns in Singapore!

Its been a while since my last post. I had been very busy with work and very lazy to pen down anything. Basically, my life revolved around my work for the past few months. Finally, I have some time for a breather and talk about my latest obsession.

It is not a new obsession, just one that got rekindled after seeing a guy selling roasted chestnut running a pressurized kerosene lantern on his side-cart motorcycle. It was pretty bright and produced a comfortable yellow glow. I thought it was interesting and wanted to purchase one for myself to try it out.

The problem began there. It was so difficult to find a dealer for such things because it just isn't relevant in Singapore. The entire island is connected to an extremely stable electricity and water grid, there is little need for off-grid/emergency equipment such as a kerosene lamp. As such, lantern mantles are not cheap and kerosene is on sale for a whopping $3.40 per 500ml.

I searched high and low and realised that an old company in Singapore actually makes kerosene lamps and export it overseas! They are a brand named "Butterfly" from http://www.butterflyleahin.com

You can watch some videos about these lanterns made by people from as far away as the USA.


So I wrote an email to the company and asked if I could buy one and they said yes! But only for local customers as they typically deal with wholesale and container loads.

The only problem remaining was that I had to take leave from my work to purchase one of these beauties from their company. Oh well, I guess good things have to be planned for.

Saturday, December 13, 2014

Kai S-Gold Dispoable Single Blade Razor

I have been using the traditional dual edge safety razor for almost a year now and I have gotten rather proficient at it. Despite the fact that the blades sometimes cost so little, they gave me comfortable shaves with great results. So, it is strange for me to pick up a pack of disposable razors. But wait!

I was sifting through forums for disposable razor recommendations when I found out that airlines do not allow the traditional safety razor blade in carry-on bags for safety reasons. After all, it is simply a piece of metal sharpened on both ends.

To keep myself clean shaven during my holiday trips, I had to bring along a disposable razor but I didn't wanted those modern multi blade cartridge razors. After some reading, I found some rave reviews for a relatively unknown single blade disposable razor from Japanese knife/blade maker KAI. Heck, I couldn't even find it in the company's product line up. Surprisingly, I found these razors on display in one of my favourite shaving haunts - Haniffa Textiles in Little India.

Reviews here:
http://badgerandblade.com/vb/showthread.php/307086-Best-disposable-SE-for-head-shaving
http://badgerandblade.com/vb/showthread.php/261082-Review-Kai-Gold-S-disposable

 At $1.80 for 10 razors, each one cost a tiny 18cents! I find it hard to imagine that razors can cost so little. Some of razor blade itself cost that much! How did they make them so cheap!?

 
The razor's design is extremely simple. Made of stamped metal bent to shape, it really reflects on the simplicity and efficiency of functional designs.


The head consist of a single blade with a plastic guard clamped onto the stamped metal handle. I don't even think it was glued together. The blade is extremely stiff and sharp, making it an efficient shaver. It is also very easy to use due to the plastic guard that is characteristic of modern cartridge razors. But unlike them, the shaving style is more similar to traditional razors - just a light touch will do.


It is a very small and lightweight razor. The ridges on the handle do provide sufficient grip when wet.


My only gripe is that the angle of the head differs from the angle of traditional razors and I will have to take note of it when switching between them. It is possible to bend the head to your preferred angle though.

I highly recommend this little gem. For those who are looking for an alternative to expensive multi blade cartridge razors but do not wish to venture into traditional razors, these little inexpensive razors offer excellent and painless shaves with the convenience of modern razors. With these around, there is little reason to spend $3-5 per replacement cartridge for a modern multi blade razor. Seriously, why add more blades when 1 does just as well?

Saturday, December 06, 2014

Should you renew your car's COE - Part 3 - Are newer cars really that good?

Singapore has always discouraged car owners from keeping old cars through a variety of disincentives such as progressively higher taxes for older cars, more frequent car testing regime as well as the forfeiture a rebate should you decide to keep your car for more than 10 years.

From the last decade, we indeed saw an improvement in car technologies and advancements such as improved safety, increasingly stringent emissions, improved efficiency and nifty add-ons that made the car more convenient, useful and desirable.

In terms of efficiency, a Golf 1.4l Blue Motion takes gets about 18km/l while a Lancer GLX 1.6l barely maintains 14.2km/l when driven in a light footed manner. They are a great comparison considering that both cars produce 105hp.

While the power difference is not appreciable, the newer DSG gearbox in the Golf is extremely responsive and the turbocharger produces a punch even during lower rpms, making its high power accessible in everyday driving conditions. The improvements do not end there. With more and more sensors and electronics on board, your car's computer can even tell if your tires are losing pressure, if any of your light bulbs are blown and how to distribute the braking and engine power in tricky driving conditions. These improvements make is safer to drive and preempts you of any issues that require your attention before it the car fails on you.

However, there is a downside to having too many sophisticated electronics. They malfunction over time due to wear and tear on electrical components. In terms of reliability, a newer car may not outperform a car from the 2000s where much its improvement were due to physical and mechanical advances. For example, the automatic transmission in 2000s cars were so reliable that automatic cars outsold manual cars while only costing a little more.

The question is, are newer cars worth the premium of paying so much more than just renewing your trusty steed? Sadly, a lot of these sophistication and still not found in entry level Japanese cars to keep prices low. The higher efficiency of European super/turbocharged engines are way better than the simple naturally aspirated Japanese engines of today. Due to the vehicular tax structure in Singapore, it discourages manufacturers from improving their cars too much, thereby raising the import value which is highly taxed. After all, Japanese cars are still aimed at the common man.

Unless you are aiming for European cars for your next purchase, you aren't getting much of an improvement from what you are getting out from your near 10 year old Japanese car.


Thursday, November 27, 2014

Should you renew your car's COE - Part 2 - Scrapping the car and buying a used car instead?

My previous blog post talked about the prices to pay for renewing COE and the considerations to have in mind when contemplating on it. Renewing a COE drains at least a few years of your savings just for a piece of paper and heck, you don't even get a new car after spending so much money.

Another advice I hear quite often is to scrap the current car, get back whatever money that is supposed to be retrieved doing so and using that money to buy a younger 2nd hand car. By doing so, you do not incur any of the penalties set by the government to encourage car owners to scrap older, less efficient cars.

If you are driving a Japanese car made in the 2000s, you would probably agree with me when I say that cars made during that decade tend to be extremely reliable, designed to be simple and require little maintenance  but is still quite economical at the same time. Honestly, the newer cars, are indeed more efficient, meets newer emission standards, while using smaller engines but with COE values sky high, it is difficult to justify the advantages for the price.

Alas, the time has come for the COE to end. Scrapping the car will get you back the following rebates:

Rebate for remaining COE lifespan
The rebate for the remaining lifespan is prorated to the percentage of remaining lifespan from the original COE value. My car's COE was bought at $13,000 and left with 1year 4 months of life. My COE rebate I would get if I de-register the car now is $13,000/120months*16months = $1,733.

Rebate for PARF (Preferential Additional Registration Fee)
To reward those who scrap their car by the end of 10 years, the PARF rebate is 50% of the ARF paid. For mine, its about $10,600. This makes up the bulk of the total rebate when scrapping my car.

Scrap value of a car
Depending on overseas demand for that particular model, you get a scrap value in the range of $500-$10000 with most Japanese cars going around $1000.

In total, my oldie but goodie car would fetch $11,600 at the end of 10 years.


But what, lets not forget that we'll need to buy a 2nd hand car to replace it. For the sake of comparison, lets just say I decide to buy another similar car to serve my needs until, hopefully, the COE crashes. A quick check online shows that someone is trying to sell a Toyota Wish 1.8 for $81,800. Subtracting the rebate I would get from my old scarp, the actual amount spent on it would be $70,200. Again, by the end of the car's lifespan in Dec 2019, I would get back another $10,600. Hence the total depreciation is $59,600 for its remaining 5 years.

This meant that the cost for replacing your car with a newer 5 year old car would set you back $59,600. Sadly, this amount isn't too far off from the current PQP price of $64,584 (2nd bidding of Nov) and you only get 5 years of use.

But wait, would the savings from not having to pay extra road tax for older cars beyond 10 years old (should you choose to renew the COE) be the saving grace for going for a newer car?