Sunday, June 10, 2012

Tampines Bike Park

A recent visit to Tampines Bike Park had me wondering why did it take so long for me to visit that biking trail. Well, it sucks to live so far from such an awesome bike park. I live in the northern part of Singapore and it is really exhausting to cycle from where I live to Tampines. If I tried, I would be too tired even before I got off road.

How to get there:
If you search for "tampines bike park" on google maps, you will not find it. The location pins are nowhere near the place. It is along tampines ave 9, at the junction of tampines ave 7. On google maps in satellite view, you would be able to see the brown meandering trails set upon the untouched patches of green, surrounded by construction sites and HDB flats. Thats it!


When I was at the entrance, I thought it was some closed up area and I was tempted to believing that the actual trail is the small rocky part on the right on the entrance. But I was entirely wrong. I think most people would have the same thinking since the mountain biking scene in Singapore isn't really developed and no one would expect a nice gated entrance to a bike trail. Especially so when Mandai's Track 15 requires one to crawl under a gate with a keep-off sign.

Upon entering, there is a sign in/out booth which reminds me of guard duty during my army days.

What facilities are there:
Normally, bike trails have 0 amenities. You get there, you ride, you get out. But this bike park left me very surprised. There are quite a few porta toilets, a big parking area that is free and the best part is, they have a place to wash our bikes! The only place that has these 3 facilties that I know of are golf courses. These are places where people pay shit loads of money to enter, but this bike park is completely free. I have no idea who is paying for all these, but I hope it lasts!


The ride:
 If you have ridden in Pulau Ubin's Ketam Bike Park, you will be in familar grounds. There are many routes to take and they are clearly demarcated according to their difficulty levels. My friend fell at a blue square grade trail for beginners. Clearly, it is not a walk in a park.

There is also a separate area for bike trials. The route looked really awesome with all the humps and curves. Would love to ride through the course if only my front brake cable didn't went loose when I was there.


Thursday, June 07, 2012

What to look for in an everyday-carry (edc) torch light?

As a battery and torchlight enthusiast, I believe that everyone should carry some sort of light with them, EVERYDAY. No, it does not need to be super bright or super chunky. Just a small reliable light that works when you need it to. I rarely get the chance to use my trusty LRI Photon III but when have to, I'm really glad that I have it with me. Two years ago, my friend and I had to walk through a short unlit underpass in Orchard area. Having my light on my keychain means that it is extremely easy to find and it allowed us to see about 1-2 metres in front of us. We couldn't see that much because we entered the underpass from inside a brightly lit building and our eyes needed time to adjust to the sudden darkness. But still, my trusty little keychain light is enough to guide us through the steps and emerge on the other side of the road. In this situation, we only needed the light for about 1 minute or so. But that 1 minute of light reduced a potentially clumsy situation into a simple stroll.

My broken at tattered blue Photon III

My dad bought this for me when he traveled to the US many years ago on a business trip and it has been on my keychain since. Fortunately or unfortunately, in Singapore, the country where I live in, blackouts are extremely rare and street lamps are virtually everywhere. But that doesn't mean that we should be complacent and not have a torch light with us! Well, if you have a smartphone, chances are, it has an LED light that works as a flash for the in-built camera and it can double up as a torch light. Given the battery that most cellphones use, the in-built LED light will probably be brighter than most keychain lights. However, turning the light on does drain the battery a lot faster than normal. So, why not bring along an EDC light?

What qualities should we look for in an EDC light? In short, I think something like Photon III makes a very good EDC light.

1) Compact and light: Being small means that it is easy to carry around and it will always be with you whenever you need it. For the smallest form factor, lights that use coin sized batteries offer the smallest package while (usually) giving decent runtime

2) Reliability: Just like an insurance policy, and EDC light is rarely used but it needs to be relied upon whenever the situation requires. Lights with low maintenance are necessary. In this case, the battery plays a very huge role since most LED torch lights do not need much care. Use only lithium batteries as they do not leak, have an extremely long shelf life of 10 years (some forumers say 20 years). Most coin sized batteries are either lithium or alkaline types (not interchangable and their sizes differ). So choose one that can accept lithium.

3) Lock out or auto-off function: A light that is moved around all the time has the possibility of having it turned on accidentally. To prevent this from happening, some brands adopt either methods to prevent the light from draining the battery accidentally.

An EDC light need not be very bright or last for many many hours on a single set of batteries. Anything with a simple 5mm nichia led will do just fine because sometimes a little light is all that is necessary to change a potentially dangerous situation into a minor inconvenience.

I hope this little write up can help you choose your EDC light  :)

Friday, May 25, 2012

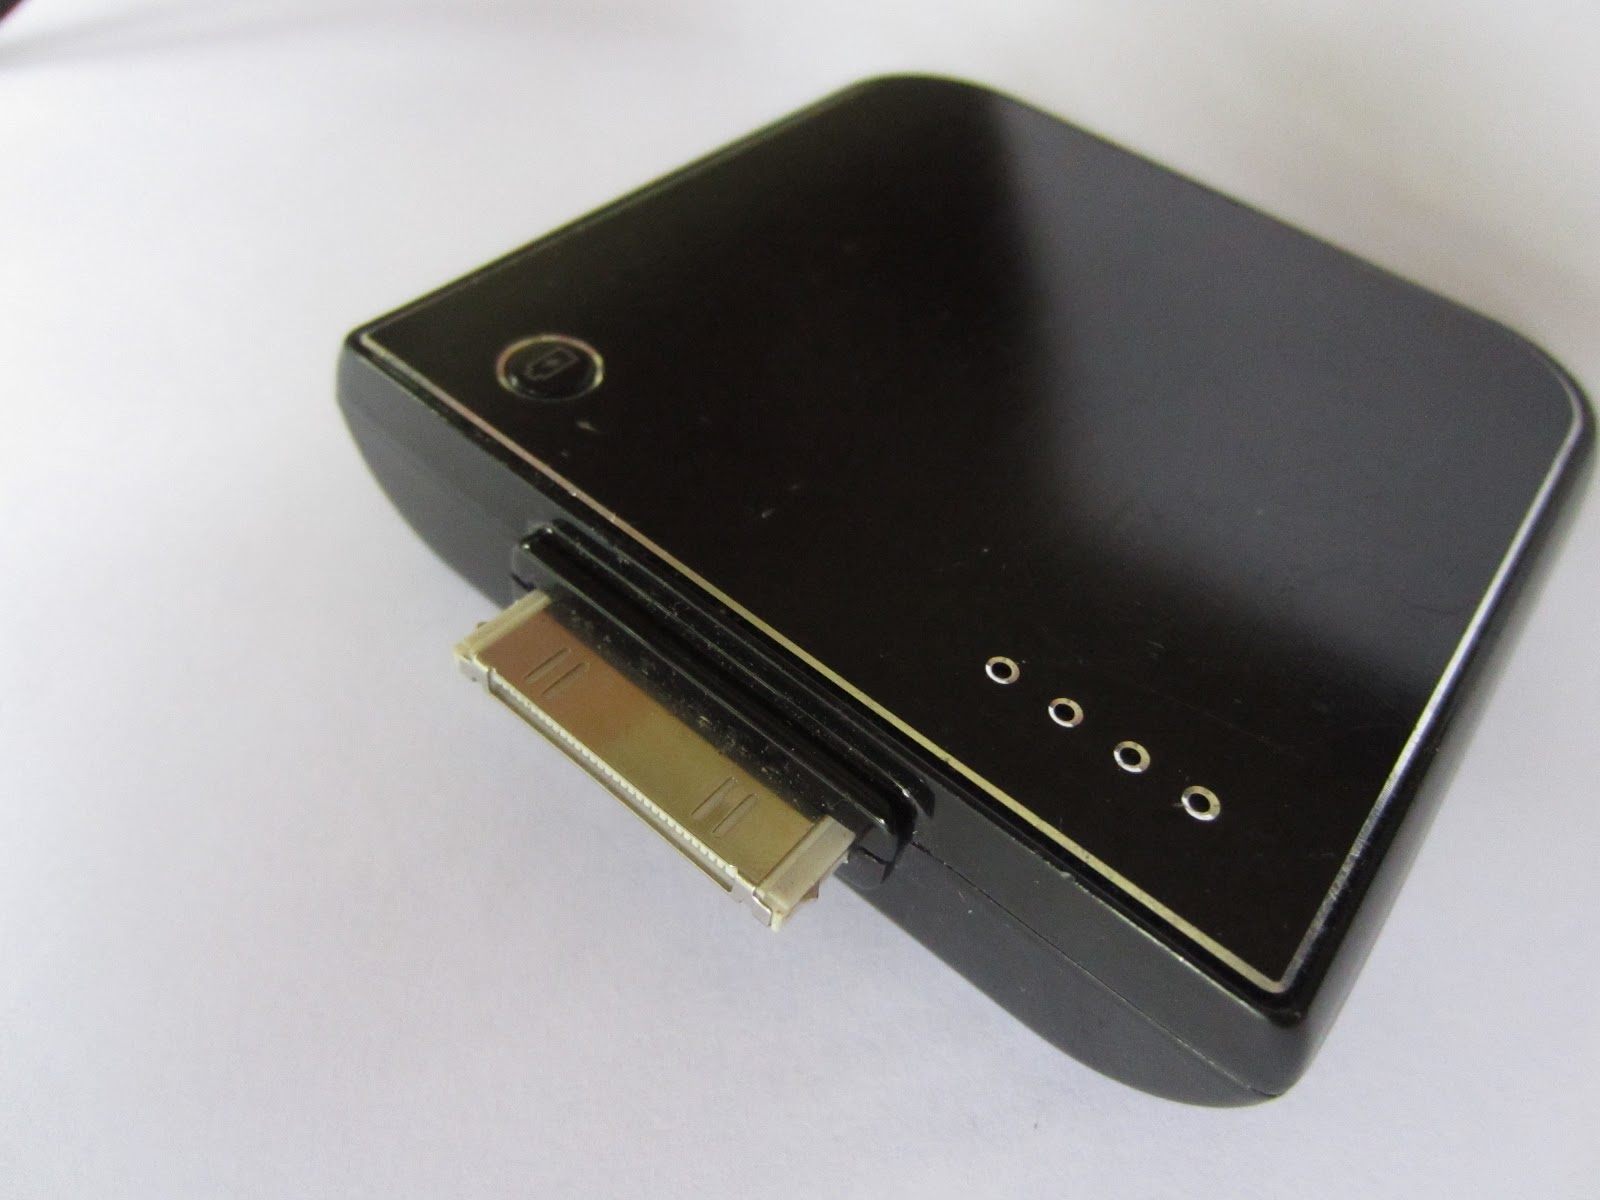
A review of my dad's emergency iphone battery charger (SKU18197)

Finally decided to do a little review on my "emergency" iphone charger.

Iphone users know how often "emergencies" crop up when they forget to recharge their phone up the night before. You know your battery isn't going to survive till the end of a long day when you leave your house in the morning with 60% charge or less, especially so when the phone serves up many different purposes in 1 single day. I find that the need for a portable charger arises most often when I am heading out with my friends for a day packed with activities. A day like this will mean that I won't be coming across any free power sockets, and even if I do, I probably won't be in one place long enough to get a substantial charge. So, this is where my "emergency" charger comes in.

In simple terms, an "emergency" charger is a battery encased with a circuit board and a connector that charges the internal battery of a phone, nothing more. At this point in time, I have two of these little critters. One handed down from my dad. Typically, these chargers contain a Lithium-polymer battery, the same type of battery that is inside an iphone. This type of battery have the highest charge density and adequate performance to provide substantial energy to your phone. To me, it is the best battery type for the job because other battery types such as Alkaline, Carbon Zinc or even Ni-MH rechargables just do not have the juice to give an iphone a good charge. Sure, carrying more of these batteries will mean more charge but it is worth the trouble?

So, here's mine. It looks suspiciously like SKU18197 from dealextreme except that the battery capacity is a little different.


Polished metal top surface. The button on the right is for checking the amount of charge left.

It says 1900mAh at the back but it is not going to be easy to verify.

The front portion has a protruding connector for charging the iphone.

While the back port is for recharging the unit. Entirely compatible with the original USB charging cable. 

The blue indicator leds light up when charging. It fits quite well despite having a protective silicon cover in the way. Also, the connector fits well despite being a non-official iphone product - it is not too loose and it feels quite sturdy. I feel confident enough to put it in my bag and let it do its business. It does get slightly warm when charging and does not produce a high pitch inductor whine (common for cheaply designed circuits).

So how fast does it charge?

To test this charger, I set the alarm for every 15 mins (except the last reading which is 10mins away) to check its progress while it is charging. The wifi is turned off while 3G and cellular data is left on to reflect typical "standby" drain from the iphone. My phone's initial charge is 38% and I ended my test with 83% - an increase of 45% charge. As this is to test the charging speed, I did not completely drain the emergency charger. Typically, it gives me about 50% plus and minus 5% depending on my phone usage. The charging speed is fairly constant, providing an addition of 10% charge for every 15mins. This is consistent with the fact that the iphone can be set to charge up at constant rate (possibly USB charging current of 500mA), which is about half the charging speed from using the original wall charger.


Overall, I think the charging speed is sufficient. Moreover, the faster the emergency charger charges the iphone, the more strain it puts on the battery, resulting in more heat, less usable capacity and lower number of charge cycles. These are physical limitations that must be considered during the design to give the maximum battery boost to the iphone given the limited capacity and the small size of the emergency charger.


Tuesday, September 20, 2011

A trip to Tioman Island (3 days 2 night)

Gathering at Kranji MRT station

We met up at Kranji MRT station at 6:45am to catch bus 170 towards Larkin Terminal at Johor Bahru. I totally overestimated the time I needed to get there and ended reaching the MRT station at 6:15am. The reason why I was so early was because I thought that the first bus timings won't be so accurate and if I missed it, I probably have to wait quite a while before the next bus comes along. Also, we had to catch the 7:45am bus from Larkin to Mersing to Tioman.

Finally, everyone arrived by 6:55am and we boarded 170. The bus was full, but not to the point of being squeezy, which was a good sign because there won't be too many people at the customs. Well, that was true for singapore's side of the customs but it still took a long time to clear the one at Malaysia. My Malaysian friends passed through without much hassle but my Japanese friend and I had to queue up at the other lanes.. The queue wasn't long but it seemed to take forever and because of that, we only managed to get though it at about 7:40am. By then, there was no way to get to Larkin on time to catch our bus. The bus lane was stuck because some bus companies stop decided to pick up their passengers, not caring about the long tailback that they have created. It was extremely frustrating to wait at the bus queue knowing that your bus is just 10metres away from you but we can't board it because we had to wait for another bus to finish receiving passengers.

Transit at Larkin Terminal

By the time we arrived at Larkin, we rushed out of the bus and started running to our next bus. Really glad to have sport shoes on for this occasion. We had ran all the way to the other side of Larkin, snaking though the crowds while clutching our bags to stop it from bouncing about as we ran. When we reach our berth, the only thing we saw was an empty lot. What a way to start our holiday, we thought, feeling disappointed as we risk a very real possibility of missing our boat to Tioman altogether. We approached one of the staff to ask if we had missed the bus and we were told that the bus is actually late! What a relief! For the first time, the tardiness of bus operators is most appreciated.

The way to Mersing

The bus took 'highway 3', which was a single lane - dual carriage way towards Mersing. Almost very similar to the roads from Pengerang to Desaru, only more undulating and curvy. In a car, it will be very pleasurable to drive on, but in a bus, it was unnerving as the driver handled the big vehicle as if it was a nimble little go-kart. Some corners get tighter as it curves and the driver simply jerks the steering to correct the amount of turn in needed rather than slowling down. I seriously doubted the quality of the tires that carried us through. For sure,  a skid will probably be unrecoverable given how heavy the bus is and how fast it was going. And it didn't help sitting at the end of the bus as every bump on the road lifts us enough to wake us up from our sleep.

Reaching Mersing terminal, we were greeted with a very quiet town. Being there on a weekend meant that most shops are closed. It is quite different from Singapore where people generally come out to shop and enjoy themselves during weekends. In Mersing, during weekends, I suppose, people stay at home to spend time with their family rather than go travel around for shopping. The terminal we arrived at was beside a river and it was a short distance from our ferry terminal at the mouth of the river. The ferry terminal was a 15 min walk away from the bus terminal. I like small towns. Anywhere you need to go is within walking distance and we could slowly soak in the views of the town. Mersing, itself feels like a town that has developed because of people stopping over en route to further places. As such, there are many small shops from ranging from internet cafes to motorycle shops to spectacle shops. The rate for the internet cafe was rm1.50 per hour and a peek inside revealed a range of activities happening inside - some people were playing games, some were on facebook and so on. HB also said that some of these internet cafes are 'illegal' as they doubled as mini gambling dens while using the computers as a front to hide their gambling.

The ferry terminal at Mersing is very easy to spot because it looks exactly like how a ferry terminal looks like - a bunch of resort operators at the side, many seats and a little rustic-style cafe by the side to cater to western tourists, eager to taste a bit of (possibly expensive) packaged culture. Of course, we didn't eat there. We headed to the next little coffee shop for a little lunch. I ordered a nice plate of Maggie Goreng and ice-lemon tea. Can't remember how much, but it was less than rm5. Great value, as expected from a coffee shop and tasty too!

Onward to Tioman

Upon heading into the waiting area, we had to pay rm5 of 'conservancy charge'. No idea how they are using the money to conserve the Tioman's nature though. Our boarding passes consist of a big red slip of laminated paper with its edges worn out from repeated use. We were also handed another piece (not the same red slip) for our return trip. The ferry is fairly comfortable. Low engine noise, no vibrations and the seats are comfortable. The boat ride was 1 hour 30mins according to the time stamp from Moahan's pictures. A speed readout from my iphone shows a speed of 40km/h (cruising). The ferry stops over at Genting (not Genting highlands) a jetty at the west of Tioman island where we had to take another small motorised boat towards our resort at Kampung Mukut at the south of the island. This small boat is simply a sampan with a honda motor at the back. Travelling at 18km/h, the boat struggles to keep itself planted on the water. The water splashed all over my face and it was quite nice to be able to touch the splashing water. It was also where I got my only sunburn during the entire trip.

Arrival at Mukut

We were a walking distance away from our resort. The resort operators hung out at "Sea Side Cafe" where our meals will be served. [to be continued]


Summary

Getting to Tioman from Singapore
1) Take public bus SBS 170 from Kranji MRT through the causeway to Larkin Terminal
2) Transit to "Causeway Link" bus from Kranji to Mersing Terminal (2h30min)
3) Walk along the river towards Mersing Ferry Terminal
4) Take Ferry towards Genting Jetty @ Tioman (Must take note of which jetty to alight at) 1h30mins
5) Transfer towards Kampung Mukut (45mins) operated by resort

Getting around Kampung Mukut
As a tourist, we do not have the luxury of having a motor vehicle or bicycle like most locals do. All our travelling is done by foot around the region. The furthest we could go was to Minang Cove resort, which was a 35min walk through paved roads, followed by a trek through the jungle since roads are still under construction.

Getting around Tioman Island
The only way to get to other parts of the island is to charter a boat for rm350 to take you to different resorts. The island is rather big - 17km long 10km wide with dense vegetation and hilly terrain in the middle of the island.

Things we did at Kampung Mukut
Since we didn't get out of Mukut, there were only a few things we could do without spending a bomb.

          Trek towards Waterfall
We trekked towards the east of our resort towards a waterfall. Follow the markings on the road saying "This way Devan" and you'll reach the waterfall. The rocks at the waterfall are very slippery but can still be very abrasive if you kick onto them. The water is pretty deep but there are ropes for you to hold on to as you walk towards the waterfall. Cool, clear water with very little tourists in the area.

          Twin Peaks Trek
Consist of 7 checkpoints towards the valley of two hills. Trekked till checkpoint 5 before getting really lost. We did not succeed in getting to the top since it was getting dark. We got lost for a huge portion of the way down before seeing a familiar path. A lot of thorny plants along the way, they are extremely sharp and easily slices through skin. Highly recommended to get a guide. Rm50 per person for the guide to bring you up.

          Snorkeling
Snorkeling was done around the jetty. Many corals were bleached and the predominant colour was greenish white. The water is extremely clear and we can easily see to the bottom. Equipment available for rent: snorkel, life jacket and flippers. All at rm10 each.

          Star Gazing
We sat at the soccer field beside a school to watch the stars. Can really see lots of stars since it was really dark at the field. There are street lamps along the paved roads but there aren't bright enough to ruin the view. Nice place to eat mooncakes and drink tea.

          Night Trek
We walked from our resort to Minang Cove through unfinished roads and foresty area in the dark just for a drink since most of shops and were closed at our side. Apparently, it isn't a good idea to go to Mukut on a weekend. Got to utilize my headlamp for the first time for a trek. Along the way, we saw some workers chatting in the dark. I was so scared to spot human figures in the distance on such a dark road until they shone back with their handphone backlight. I was very surprised to see that they are able to find their way around using just the light form their handphone screens! On our way back, we tried using minimal light and realised we could see enough to walk around using the moonlight. Even 2AA Maglight looked amazingly bright when our eyes are adapted to the dark. I was really loving my headlamp until HB turned on her iphone light. Haha. Kena owned by a phone!

Character of Kampung Mukut
Kampung Mukut is really just a small village with in the midst of it. It is a full fledged village with several mama shops serving the community and tourists, a mini school with a canteen of only 1 stall, a mosque and a police station. This part of the island would probably resemble Singapore's Pulau Ubin in its heydays of granite mining. We were pleasantly surprised to see 2 students alighting at our jetty at 7am in the morning to attend school. We also spotted people making fishing nets and collecting their catch at night. We saw no other economic activity in the area. Presumably, the villagers go to other parts of the island or back to mainland Malaysia to work.

The resort feels detached from the village. While the village is predominantly Malay, the resort operators consist of two chinese guys and 1 indian guy. The resort does not seem to make use of the village as workforce other than the cook. But we suspect that the food also comes from the village. The food consist largely of seafood, fruits, vegetable and chicken (possibly one of those we saw strolling around the resort the day before). The Malays seem to indulge in smoking while the non-Malays (the resort operators) are often slightly tipsy at all times of the day until they run out of beer.

The main mode of transport in this village is by motorcycle and bicycle. The roads are not big enough for cars and there ain't many roads to drive or ride on anyway. It is a very slow paced area where not many things happen in a day. Even the resort operators expect you to be bumming around. Of course, as city dwellers, we find that very difficult to do. This area is extremely boring if you are looking forward for beaches, drinks, water sports (other than snorkeling or diving). Otherwise, it may be a good place to mingle with the locals, provided that you can speak malay and possibly get to know them. Most of the locals we encountered are very friendly and would be the first to say hi when we walk pass them.

This area should be very safe considering that nothing happened even though we absentmindedly left our doors unlocked or with the keys hanging at the door.

T Resort @ Mukut
The resort is extremely minimal. They don't sell anything and I really mean ANYTHING. Beverages and snacks need to be purchased from mama shops around the island and that is about all you can find there. There are two rooms to each individual kampung style house. Very low quality building. Our sink was on the verge of dropping out of its fixture and the lights are just a dim glow. Our air conditioner was faulty and when we approached the operator to ask if we could have a discount since there was nothing they could do about it at that time, Rony, the operator was switched from his usual chatty mood to becoming rather hostile. Instead of an apology, he told us "your motor puncture, your problem wad". This forced my friend to replied "but hey, it is your resort, you know?". His colleague, sensing the situation was bad, cut in to say that he will change our rooms first thing in the morning.

Also, at rm350 for the 3D2N package per pax, all they do is to bring you to the jetty for snorkeling. Even the snorkeling equipment needs to be rented separately. Personally, that is a lot of money to pay for the operators to bum around. Only the meals were good but even so, they do not justify the high cost. Admittedly, that is one of the cheapest resorts that provide a reasonable place to sleep at night. However, spending another rm20 may able to get you a better resort with more facilities. From what we expect to do there (i.e. playing at the beach, drinking and doing stuff that people normally do at resorts), we failed to achieve most of them.

Although Rony became overly courteous from the 2nd day on, it no longer feels genuine. But rather, a facade to save his hostile behaviour on the first day. And that, feels very disgusting. Also, I cannot tolerate it when people drink while they are working, even if they are not directly serving us. There is a very thin line in being overly friendly and harassment and drinking blurs that ability to judge the situation clearly.

I won't recommend this resort unless what you want to do is to get a place to sleep in. In this case, saving money by paying for one of the cheaper resorts in this island is just being penny wise but pound foolish. 


Sunday, July 10, 2011

portable phone charger (part 3)

It is time to conclude my thoughts on making a portable charger. In the end, I chanced upon one on sale that is sold at a really cheap price. The best part is that the charger works. It imitates the way USB charging works and delivers a slow, but not unreasonably slow, charge to the phone. I bought it USD$4.53 from Dealextreme and it took 2 weeks to arrive. It was quite a long wait and I never knew if it would ever arrive, considering the fact that it wasn't a registered package. Nevertheless, the postman popped a yellow package into my mailbox and I knew it has finally arrived!

First Impressions:
This gadget is made with cheap plastic - the kind that will disintegrate after a few years of use. But thats ok considering the price. Moreover, the important thing is the circuitry, which can be removed and placed in a better container if necessary.
It is a made-in-china gadget that actually works. The construction is actually quite sturdy and yet, it is easy to slide in the batteries to power up the charger. The switch is not very secure so I won't recommend leaving your batteries inside when you are not using it, lest it drains away your precious battery power.

The LED light is so dim that it is practically useless. I'm not kidding! Its so dim that I have to switch off all my room lights just for my eyes to register a dim glow that is coming out of that LED.

Does it work with the latest Iphone4?
According to the interwebs, iphones are very strict with the charging protocols. Either it takes in energy at the precise programmed rate or it takes nothing at all. This is also the case with other new smartphones and I am very glad to report that it does work. This means that the charger is set up to USB charging specifications, which is to supply 0.5A at 5V at the power terminals. The original wall charger provides the juice at 1A at 5V. Those who knows a bit of electricity will point out that this portable charger charges at half the speed of the wall charger.

Slow Charging is good charging!
Fortunately, slow charging equals efficient charging. It means that less energy is lost as heat and the batteries don't have to work as hard. This is important because the faster you try to drain energy from a battery, the faster it dies. This may sound reasonable, but the drain is not actually proportional! I measured the current going out of the batteries and it is at 1.1A. At this rate, NiMH rechargables will perform within their design parameters and work well. On the other hand, alkaline batteries will only be able to supply about 1/3 of their typical capacity. This is because alkaline batteries are outdated and were actually designed for low power drain (around 0.2 to 0.5mA) despite what their packaging may say. If you really have to use disposable batteries, go for the most expensive lithium AAs. They are worth the performance and the reliability in extreme temperatures and can be stored for 10years and more without failure.

Performance and tests:
The batteries I used are 2400mAh Powerex Imedions, which should provide about 5.8Wh. On the other hand, the Iphone 4's battery is said to be 5.3Wh. By right, that means that I should be able to charge the Iphone just slightly more than 1 full charge. However, that is not the case. Due to the inefficiencies involved, my pair of AA batteries can only charge up to about 35% before it stops. Also, it feels quite warm to the touch. Therefore, the efficiency is less than half! It is slightly less efficient than I expected but it doesn't make it a bad charger. Inefficiencies are always expected as part of a charging process. It is an emergency charger and not a full fledged replacement charger. Hence, it is reasonable to expect such a performance.

Drawbacks:
The only thing I don't like about this charger is the lack of battery indicators. You never know if you are overdraining your batteries. It is fine when you are using disposables, if you overdrain rechargables, its lifespan will be shortened and some damage will be incurred. Otherwise, I can see it being a lifesaver in a rural areas.


Conclusion:
If you have to recharge your phone regularly while on the go, you may prefer those portable chargers that make use of internal rechargable Li-ion batteries. These batteries are not removable but they pack a lot more power and it is more cost effective in the long run. Best of all, when the internal batteries die, we can always pry open the cover and replace it with a new one (if you can find a replacement).

Note: I am not affiliated to dealextreme or the charger. I paid for the charger myself. The reason why I am reviewing this is because a close friend of mine is going to India and will be spending some time in less-developed villages. I hope it helps you in keeping your smartphone working :)

Saturday, May 28, 2011

portable phone charger designs (part 2)

In the previous entry, I stumbled upon the rather strange requirement of how to minimize voltage drop while the batteries in the portable charger drains. I've found some youtube videos and some write-ups on instructables.com about building portable phone chargers. Being a physics undergrad who likes batteries and collects torchlights, I could see several drawbacks regarding some of these chargers.

So, discuss what these drawbacks are and what advantages do these designs actually offer.


Design 1:
9V battery + Zener Diode combination


Using a 9V battery connected to a Zener Diode, the output voltage can be effectively dropped down to the required 5V to charge most phones. According to article [1], the Zener Diode that brings the voltage closest to 5V is 1N4733. It brings the 9V down to 5.1V and has a maximum regulated current is 178mA.
Advantages
- This design is extremely simple and according to youtube videos, they do seem to trick their phones into thinking that they are plugged into an authentic charger.

Disadvantages
- 9V battery
This type of battery is not made for high current drain. Notice that applications of 9V battery include powering up remote controls, portable door chimes and fire alarms. These applications take very little current and will last many months before it needs a battery change. Phones will attempt to suck as much energy as possible during the charging process and will definitely take in more current than what the 9V battery can comfortable provide. In the first place, 9V batteries do not have much energy in them and this high drain will result in premature death of the 9V battery. According to energizer's datasheet [2], at an estimated 500mA drain (standard current that is provided by USB ports), the 9V battery provides only about 300mAh. Theoretically, that should be able to charge up a Nokia N73 to a quarter assuming that the Zener diode does not burn up and about 60% efficiency (because some of this energy heats up the phone when charging).

- Tiny current capability
If we examine the charging current provided by most wall plug-in chargers, the usual current is about 1000mA and a phone using this amount of current will take about 2-3hours to fully charge a drained battery. Assuming that the Zener diode does not go up in smoke, the current of 178mA will charge a dead phone battery in an estimated 11h-16h. That is a heck of a long time.

Design 2:
Battery + Step up/Step down Converter (Switching converter)

See http://www.ladyada.net/make/mintyboost/

This design is considerably more expensive and more complicated because it involves a switching voltage regulation microchip (not those that simply turn excess voltage into heat), some inductors, capacitors and diodes just to get it going. I won't talk about the principles of step up/down converters because it is far too complicated for me to understand. All I know is, they change the input voltage to a voltage that we desire.

Note that there is a simpler voltage regular called the linear regulator. This simply burns up excess voltage so that the output is constantly at 5V. This works only when the input is more than the desired voltage. Very inefficient and wasteful!

Advantages:
Achieves very high efficiency.
Flexibility to use batteries that are designed for high drain (AA batteries)
Circuit can be designed to handle high current comfortably.
Provides excellent charging.

Disadvantages:
Damn expensive - a well designed branded portable phone charger such as the Griffin Tunejuice costs SGD$46.90 in Singapore. [3]

Still quite expensive - a pre-packaged D-I-Y project called "Minty Boost" by Adafruit Industries provide all the necessary components for a simple step-by-step soldering job. However, when shipped from USA, the total price is about USD$30. This is only about SGD$10 cheaper than a cool-looking branded one. Not to mention, I'll still need to get a soldering iron to get all the parts together.

Design 3:
Direct charing from 4x AA batteries / CR123A batteries

(This video makes use of 2x CR123A lithium camera batteries for more juice)

This design is no design at all. It relies on the AA batteries to provide the necessary voltage needed to charge the phone battery. Unlike the portable charger I've bought (which uses smaller AAA batteries), it is possible that using AA batteries can solve the problem of voltage sagging.

Why am I still interested in this design? In a forum discussion, someone mentioned using 4x 2700mAh AA Ni-MH batteries and managed to charge his phone 5 times! Of course, that depends on the capacity of the phone battery in the first place. Meaning, my mileage may vary. Even so, this is quite a good news!

Advantages
- Less components mean less energy wasted on powering up components

Disadvantages
- Voltage uncertainty
Using 4x alkaline batteries give 6V, 4x Ni-MH rechargeables give 4.8V. Don't know if 6V will actually fry the phone or not.
- May not be able to fully utilise the batteries as it drains
Same as my original charger, this may still be a problem! Only experiments can tell us if it still plagued by this problem!

Ok, enough of theory talk and estimates. In my next entry, its time for experimentation! (If my multimeter arrives soon :( I've been waiting for almost 2 weeks already)


References:

[1] http://knol.google.com/k/electronic-circuits-design-for-beginners-chapter-7#

[2] http://data.energizer.com/PDFs/522.pdf

[3] http://www.istore.com.sg/default/tunejuice-universal-for-iphone-3g-3gs-by-griffin.html

[4] http://forums.adafruit.com/viewtopic.php?f=15&t=18360

Monday, May 16, 2011

Project: Make a portable phone charger (part 1)

My first encounter with this device and why I want to make my own!

My first encounter with portable handphone chargers was during my time in BMT (basic military training) in Pulau Tekong. As recruits, we were not allowed to use electricity in camp. We were told that this rule was in place so that we do not end up overloading the generators that were powering the island. I felt that it was utter bullshit because the only time we could use the electricity was at night when most electronic appliances are switched off. But still, nothing much could be done about it since we had no rights and no say.

I am someone who is really addicted to technology, so much so that I don't feel right if I leave my house with my handphone battery at half capacity even though I was only going for only a few hours. I was quite glad that I am able to bring my phone to camp although it would be next to useless if the battery went dead. Knowing this, I definitely have to do something to get around this problem. I felt that it was kind of wasteful and stupid to buy another handphone battery (about $30) when the training will only last 3 months and I'll still be left without any communication when the extra battery is used up anyway.


I needed something that is able to use disposable batteries and it seemed that a portable handphone charger was ideal choice for this situation. So, I bought this at Sim Lim Square for less than $10. It uses 4x AAA batteries and when I plugged it into my phone, it worked! The screen showed that it was charging. Wonderful.

During the first week of my 2-week confinement, I used my phone really sparingly, turning it on at night only to check for messages and to send stuff out. I even took out the battery from the phone when I did not need to use it. All these measures helped to keep me contactable but 1 week was all I can squeeze out of my battery. Still, it was longer than I expected and a boost from my newly bought portable charger should be sufficient to last me the rest of my confinement week. I even lent my battery the poor souls who did not prepare for this. Good eh?

Happily, I plugged in my portable charger and placed it inside my cupboard. After 30mins, I came back to check on it and to my greatest horror, the phone was no longer charging and my phone was showing an additional 1 bar extra. That was all it could do. Unplugging and plugging it again did nothing. The screen flashed "NOT CHARGING". Die! This time, I screwed up. I knew that my parents would be coming to pick me up from Pasir Ris for my first book-out, so I really needed my phone to tell them exactly where to meet me. There was no way a battery at 1 bar (out of 5) could last another week of sparing usage. I was even unsure if it can hold its charge even if I don't use it at all. Sure enough, when the time came, I couldn't even establish a call without the phone shutting down.

After this incident, I went to check the AAA batteries inside my portable charger. All of them were still fresh. I could power them in my trusty MP3 player and still use them for many hours before they were depleted. What was wrong with it? Why did it not continue charging even though those AAA batteries were still fresh?


These questions led me to suspect that charging may be quite a complicated process and the charger may not be capable to utilize the energy in those disposable batteries. It took me quite a few years of procrastination to finally decide that I should take a closer look at the innards of the charger I bought during my younger days.


Ah! That's the reason why I couldn't charge my phone effectively. The only component inside this charger was a diode! A diode is a component that is made such that electrical current can flow only in one direction. This prevents the backflow of electricity should the battery in the phone overpower the portable charger. Its a nice safety feature, but it doesn't make it work any better. Normal AAA batteries have 1.5V. Having 4 of these will give 6V. My phone required a minimum of 5V to charge the battery. While the portable charger charges my phone, the battery voltage drops as it depletes. The moment each battery drops to 1.25V, the phone no longer continues charging. It is quite a shame because at 1.25V, these batteries still have a lot of energy left in them.

The important question is how, if it is possible, to eliminate this voltage drop from the batteries.

Tuesday, June 23, 2009

This scooter is interesting!

Recently, I saw a short article on TODAY. It was about an electric scooter from Zeco. For those who are concerned about the environment, this is probably the best news ever - Zeco claims that the bike is 10 times cheaper to run than conventional petrol driven motorbikes. An eco-friendly person can save the Earth while saving a considerable amount of money, so it seems.


Is this bike similar to a CNG car - too much hassle, too inconvenient, and doesn't save appreciable amount of $$? Well, lets look at the specifications.

Model E-MAX 90S E-MAX 110S
Battery concept Silicon Silicon
Maximum Speed 50 km/h 50 km/h
Battery Capacity 4 x 12V/40Ah 4 x 12V/60Ah
Distance Range 45-60 km 70-90 km
Motor (nominal Power) 4000W 13" high torque maintenance free motor 4000W 13" high torque maintenance free motor
Voltage (maximum) 48V (53V) 48V (53V)
Output (with Booster) 45A (80A) 45A (80A)
Charging time 3-5 hours 3.5-5 hours
Power in kW (with Booster) 2 (3.2) 2 (3.2)
Weight Approx. 155 kg Approx. 195 kg
Brakes Hydraulic floating disc brake Hydraulic floating disc brake
Tires 130/60 - 13 130/60 - 13
Rim Aluminium Aluminium
Front and rear shock absorber Oil/gas pressure Oil/gas pressure
Warranty on Battery 1 year or 10,000 km 1 year or 10,000 km
Retail Price S$ 6,999 S$ 7,399


Perhaps the most striking thing on this list is the MAXIMUM SPEED of 50km/h which is damn slow for singapore roads. According to Zeco, 50km/h is good enough as "the average Singapore motorist travels a distance of 25 km/h to 27 km/h on city roads."

But is it? To achieve an AVERAGE speed of 25km/h to 27km/h, the motorist have to be achieve a much faster instantaneous speed to make up for all the lost time waiting at traffic lights and accelerating from stop. No one travels at a constant speed of 25km/h in town traffic, it's start-stop all the way to the parking lot. So, a max speed of 50km/h isn't necessarily enough to blend in with the rest of the motorists.

The next thing to notice is the charging time? Yea, it runs entirely on battery. So, you're really screwed if you accidentally run out of juice. Good luck on pushing it - it weights the same as my 1000cc dream bike, the Honda CBR1000R Fireblade. The only difference is that the Fireblade has a maximum power of 133kW compared to the Zeco's puny 3.2kW. I really wonder how long does it take for the zeco to get up to it's maximum speed.


3.5-5hours of charging actually sounds okay if you charge it as soon as you reach your destination so that it is well prepared for the next trip. Another problem is that you'll need a landed property to charge your bike or resort to parking at their "greenlot" charging points far away from your high rise housing.

If all these does not scare you away from it, lets talk about the price. For $7399, it is possible to get a new decent Class 2B bike (200cc and below) while reasonable used bikes can be bought at around $2500. So why should anyone choose the zeco over a normal motorcycle? Again, zeco claims that it is far more cheaper to run it.

"the cost of running a Zeco is just 70 cents for every 100 kilometres; petrol is almost ten times that, at $7 for every 100 kilometres"

They may be right on this point, but they have compared it to a petrol bike of a fuel efficiency equivalent to bigger bikes. Still, the savings are significant compared to petrol bike. Then comes the issue of maintenance. In about a couple of years, the battery will need to be replaced and I'm guessing that the battery costs at least $1000.

at this point of time, the high initial cost of the bike is not very justified. What are you paying for?
If you ask me, I would rather get a good electric bicycle for $1000. At least I won't have to pay for ERP, parking lots and pointless third-party insurance. Best of all, I can beat red lights without the fear of being 'flashed'. Now, if only the zeco is $3000, I would...